This article will explain how to link your business income to show aggregation of business operations as discussed in Section 1.199A-4 and provide an explanatory statement.
To link multiple businesses to show your first aggregation of business operation - Individual module
- Go to your first business:
- Screen 16, Business Income (Schedule C)
- Screen 18, Rental & Royalty Income (Schedule E)
- Screen 19, Farm Income (Schedule F / Form 4835)
- Screen 20.1, Partnership Information
- Screen 20.2, S Corporation Information
- Screen 20.3, Estate and Trust Information
- Within the business activity, locate the applicable section:
- Screen 16, Qualified Business Income Deduction
- Screen 18, Qualified Business Income Deduction
- Screen 19, Qualified Business Income Deduction
- Screen 20.1, Line 20 - Other
- Screen 20.2, Line 17 - Other Information
- Screen 20.3, Line 14 - Other Information
- Enter a 1 in the following field to indicate your first aggregate business:
- Screen 16, Aggregate Tax Identification Number (code 453)
- Screen 18, Aggregate Tax Identification Number (code 450)
- Screen 19, Aggregate Tax Identification Number (code 453)
- Screen 20.1, Section 199A (20Z - 20AB) Aggregate Tax Identification Number (code 1152)
- Screen 20.2, Section 199A (17V - 17X) Aggregate Tax Identification Number (code 1152)
- Screen 20.3, Section 199A (14I) Aggregate Tax Identification Number (code 1152)
- Enter a description in the following field to explain how these businesses are allowed to be aggregated:
- Screen 16, Description of aggregated businesses and explanation of how they are allowed to be aggregated. (CTRL+E) (455)
- Screen 18, Description of aggregated businesses and explanation of how they are allowed to be aggregated. (CTRL+E) (452)
- Screen 19, Description of aggregated businesses and explanation of how they are allowed to be aggregated. (CTRL+E) (455)
- Screen 20.1, Explanation of Aggregation (code 1160)
- Screen 20.2, Explanation of Aggregation (code 1160)
- Screen 20.3, Explanation of Aggregation (code 1160)
- Repeat steps for each additional business activity to be included in Aggregate Tax Identification Number 1.
- The explanation only needs to be entered once for each aggregated business income grouping.
To create a second aggregate business grouping, repeat steps, marking as Aggregate Tax Identification Number 2.
To link multiple businesses to show your first aggregation of business operations - Fiduciary module
- Go to your first business:
- Screen 21, Business Income (Schedule C)
- Screen 23, Rent & Royalty (Schedule E)
- Screen 24, Farm (Schedule F)
- Screen 25, Passthrough K-1s
- Within the business activity locate the applicable section:
- Screen 21, Qualified Business Income Deduction
- Screen 23, Qualified Business Income Deduction
- Screen 24, Qualified Business Income Deduction
- Screen 25, Other (20)
- Enter a 1 in the following field to indicate your first aggregate business:
- Screen 21, Aggregate Tax Identification Number (code 453)
- Screen 23, Aggregate Tax Identification Number (code 453)
- Screen 24, Aggregate Tax Identification Number (code 451)
- Screen 25, Section 199A - Aggregate Tax Identification Number (code 1152)
- Enter a description in the following field to explain how these businesses are allowed to be aggregated:
- Screen 21, Description of aggregated businesses and explanation of how they are allowed to be aggregated. (CTRL+E) (455)
- Screen 23, Description of aggregated businesses and explanation of how they are allowed to be aggregated. (CTRL+E) (455)
- Screen 24, Description of aggregated businesses and explanation of how they are allowed to be aggregated. (CTRL+E) (453)
- Screen 25, Section 199A - Explanation of Aggregation (code 1160)
- Repeat steps for each additional business activity to be included in Aggregate Tax Identification Number 1.
- The explanation only needs to be entered once for each aggregated business income grouping.
To create a second aggregate business grouping, repeat steps marking as Aggregate Tax Identification Number 2.
To make the Safe Harbor Election when aggregating Rental Real Estate income - Individual and Fiduciary
When aggregating Schedule E income, and making the Safe Harbor election you'll want to avoid producing an election for each of the activities in the aggregated grouping.
- Go to the Schedule E screen.
- Individual: Screen 18, Rental & Royalty Income (Schedule E)
- Fiduciary: Screen 23, Rent & Royalty (Schedule E)
- Scroll down to the Qualified Business Income Deduction section.
- Select the box for Claiming safe harbor on rental real estate per IRS Notice 2019-07.
- This should only be selected on one of the activities in the grouping. In the left panel, select the next activity within this aggregate grouping.
- Within the Qualified Business Income Deduction section, enter a 1 in the field for Business is a qualified trade or business: 1=yes, 2=no [O].
- When you select the safe harbor election, this signifies the activity as a qualified trade or business. Marking a yes here, satisfies this requirement while preventing safe harbor election statements to be generated for every activity within the aggregate grouping.
To make an election for a second aggregate business grouping, repeat steps.
Forms view and filing the return
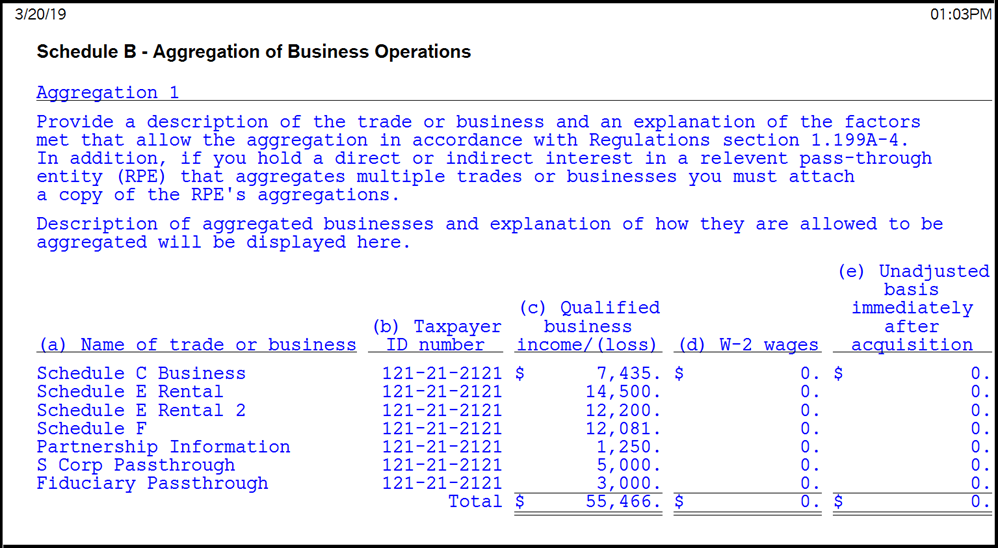
Worksheets Schedule B - Aggregation of Business Operations
Once complete, the aggregate income will be displayed in Forms view within the Worksheets. Each aggregate grouping will be listed separately. Example: Aggregation 1, Aggregation 2, etc.
The Schedule B - Aggregation of Business Operations worksheet is automatically included as a statement with the e-filing of the tax return. The Lacerte options to Auto Generate and Attach PDFs to E-Files should be set to yes for this to occur.
Follow these steps to verify this option in Lacerte
If you are on a network, you'll want to check both local and primary options.
- Go to the Settings dropdown menu.
- Select Options (network also select Primary Options).
- Select the Setup tab.
- Make sure Auto Generate and Attach PDFs to EFiles is set to Yes.
- Select OK to save and close the window.
Once the e-file has been created within the e-file wizard, the following information will be displayed on the General Information page in Forms view.
Sample image of General Information page