ProConnect HelpIntuit HelpIntuit

Using client letters in ProSeries Professional

SOLVEDby Intuit321Updated December 19, 2023

Before you start:

  • ProSeries Basic doesn't have the same client letters as ProSeries Professional.
  • The Firm Heading won't populate on the letter when the return is set up as a Non-Paid Preparer or Self-Prepared.
  • For more information on using insert and trigger codes, review "Chapter 18, Client and Recipient Letters - Editing and formatting letters" in the ProSeries User's Guide

Click on a topic below to learn more.

New letters in ProSeries 2020 and newer:

Starting in tax year 2020 ProSeries introduces new Standard Letters that are available for tax return clients:

  • Standard Client Letter
  • Engagement Letter
  • Privacy Statement Letter
  • Consent to Disclose Letter
  • Consent to Use Letter
  • Spanish Standard Client Letter
  • Amended Letter

How do I pick which letter prints with the return?

With more then one letter to choose from you can now customize what letters print with the return:

  1. Open a client.
  2. From the File menu, select Print Options.
  3. From the left side of the screen, select Control Which Letters Print. 
    • Here, you can customize what letter prints with each specific copy of the return.
  4. Click OK to save your changes.
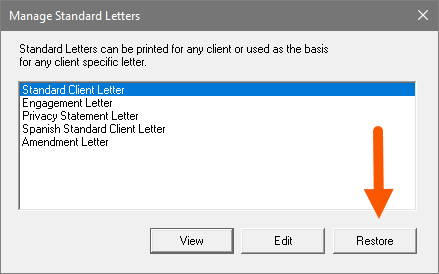
  1. Open the client file.
  2. From the Tools menu, select Letters and choose Edit Client Letter.
  3. Pick the Standard Client Letter or Custom Client Letter.
    • Changes to the Standard letter apply to all clients for that type of return. Changes to the Custom letter apply to one client.
  4. Scroll to the very end of the letter to the last code [@OGMPrepName].
  5. Click right after the ] and press the Enter key twice.
  6. From the Insert menu, select Page Break.
  7. Move the cursor on the line below the dotted gray line running across the bottom of the letter.
  8. On the right, click on the Org (paragraph icon) tab at the bottom of the code list.
  9. Double-click the code that says Engagement Letter.
  10. To view the client letter before printing or saving, click on the Print Preview button on the letter toolbar.
  11. From the File menu, select Exit Letter. 

Changes to the standard client letter will apply to all clients of the same tax type. To edit the standard client letter:

  1. Open a client file. 
  2. Go to the Tools menu, select Letters and choose Manage Standard Letters.
  3. Select Standard Client Letter
  4. Click Edit to open the letter editor.
  5. Edit the letter with the information you want to appear by using the Insert Code feature, or manually type in the information.
  6. When you finish making changes, click the File menu and choose Save Standard Client Letter.
  7. To view the client letter before printing or saving, click on the Print Preview button on the letter toolbar.
  8. From the File menu, select Exit Letter. 
  1. Open a client file.
  2. From the Tools menu, select Letters and choose Manage Client Specific Letters.
  3. Select Create new letter.
  4. Pick a Template to start or choose None if you want to start with a blank letter.
  5. Enter a name for your new letter.
  6. Click Next to open the Letter Editor.
  7. Edit the letter with the information you want to appear by using the Insert Code feature, or manually type in the information.
  8. When you finish making changes click on the File menu and choose Save.
  9. To view the client letter before printing or saving, click on the Print Preview button the letter toolbar.
  10. From the File menu, select Exit Letter. 

If you're using ProSeries 2019 or newer:

  1. Open a tax return.
  2. From the Tools menu, select Letters and choose Manage Letters for whichever letter type you need to restore.
  3. Highlight the letter you need to restore and click Restore.
    • If Restore is grayed out, this typically means there are no saved changes to that letter.
      PCG_PS_L3jVnIVHI_1.png

If you're using ProSeries 2018 or prior:

  1. Open a tax return.
  2. From the Tools menu, select Letters and choose Restore Initial Standard Letter.

For individual returns:

  1. Open the tax return to the Federal Information Worksheet. 
  2. Scroll down to Part XII - Client Letter Information.
  3. Enter the desired salutation on the Taxpayer's first name salutation field and, if applicable, the Spouse's first name salutation field.

For business returns:

  1. Open the worksheet titled Information for Client Letter. 
  2. Enter the salutation in the field for Client's salutation.

ProSeries doesn't have a built-in ability to transfer letters. However, there's a way to manually transfer the files. Some insert codes in last year's standard client letter might not work with this year's ProSeriess program. If they don't work, the code itself will print in the letter, instead of the data value.

To manually transfer the letter files, you'll need to manually copy the *.RTF files from old ProWin22Common folder to the current year ProWin23Common folder:


This article references default installation paths and uses YY to reference the tax year in 20YY format. C: will always indicate the local drive and X: will always indicate the network drive.

  1. Make sure ProSeries 2023 and ProSeries 2022 are both closed.
  2. Go to the prior year folder X:\ProWin22\Common.
  3. Sort the files by type.
  4. Highlight all the files that have the extension RTF.
  5. Right-click on the files and choose Copy.
  6. Open the X:\ProWin23\Common folder.
  7. Right-click and choose Paste.
  8. When prompted to overwrite existing files, choose Yes.
  9. Open ProSeries 2023.
  10. Open a tax return.
  11. From the Tools menu, select Letters and choose Manage Standard Letters.
  12. Choose the Standard Client Letter and click Edit.
  13. Edit the dates and other information as necessary.
  14. Review the letter to make sure it's correct.
  1. Open the client file.
  2. From the Tools menu, select Letters and choose Edit Client Letter.
  3. Pick the Standard Client Letter or Custom Client Letter.
    • Changes to the Standard letter apply to all clients for that type of return. Changes to the Custom letter apply to one client.
  4. Select the point inside the letter where you'd like to show the amended information. Click inside the letter to place the cursor at the desired point.
  5. On the right, click on the Fed (paragraph icon) tab at the bottom of the code list.
  6. Double-click the code that says Amended Letter.

If a state paragraph is also required:

  1. Select the point inside the letter where you would like to show the amended information. Click inside the letter to place the cursor at the desired point.
  2. On the right, click on the State (paragraph icon) tab at the bottom of the code list.
  3. Scroll to the desired state and double-click the code that says Amended State Paragraph.

Was this helpful?

You must sign in to vote, reply, or post
ProSeries Basic

Sign in for the best experience

Ask questions, get answers, and join our large community of Intuit Accountants users.

More like this

Dynamic AdsDynamic Ads