Table of contents:
The User Options menu in Lacerte allows you to customize the program to match your needs and the needs of your firm. Customizable options include:
- Where to save client files
- How the program displays
- The order of the client database
- How the program calculates and prints tax return forms and documents
How to change user options
Under the Settings menu, the Options and Primary Options windows control many program features.
- Changes to Options customize Lacerte on only one computer.
- Changes to Primary Options are shared across the network.
- Each tax module displays a different set of user options.
How to customize your setup
- In the Settings menu, choose Options.
- In the Individual User Options window, click on the Setup tab to specify preferences for general program operations and printing.
- Data Path tells the program where to save your data files.
- Printer Selection sets your default printer option.
- Numeric Detail Input specifies Input Method, Smart Input, and Automatic Detail Save.
- Client Selection allows you to opt-in or out of Automatic Numbering and Display Total Number of Clients.
- When clients are in your office, you may not wish to display the number of clients on your client list.
- Select Yes to display the number and No to only display the number of clients selected.
- The Complete Return - Printer/PDF/DMS/SV sections set the default number of copies and copy types you want printed for a complete return.
- PDF is Portable Document Format
- DMS is Document Management System
- SV is Smart Vault
- Complete Return - Email controls how to generate a password for emailed PDF copies.
- DMS Options controls how you want specific filing types organized within DMS.
- Expandable/Collapsible Sections controls whether sections with no data automatically expand or collapse while in an input screen.
- Tax Import Options lets you view the file folder in which your Tax Import items are stored.
How to customize Trustee Rights for network users
- In the Settings menu, choose Primary Options.
- In the Trustee Rights tab, network administrators can grant and revoke each network user's rights to a program or feature.
- See Setting Trustee Rights to grant or revoke user access to program features in Lacerte for instructions.
How to customize status options
- In the Settings menu, choose Primary Options.
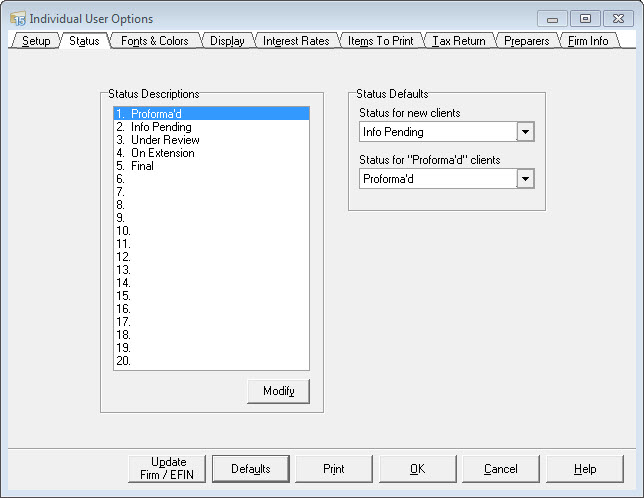
- On the Status tab, customize Status Descriptions to help identify where clients are in your firm's review process.
- Each tax program includes five modifiable, default client statuses and up to 15 additional statuses you can create (see below for a recommendations list).
To modify or add a new client status:
- Select the status description or choose a blank line.
- Click Modify.
- Enter the new status text and click OK.
We recommend the following custom statuses to track your electronic workflow: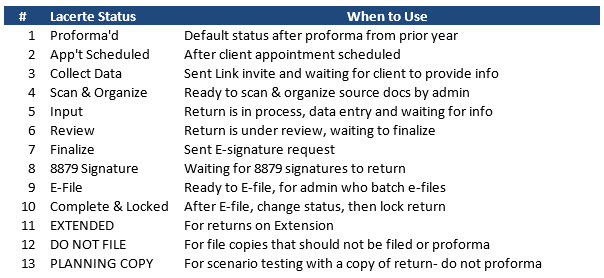
The program keeps a history of the status assigned to each client. This helps you:
- View which preparer worked on a client's return.
- See when various stages of review were completed.
- For example, if you want to check who changed a client's status to Final, you can use Client Status to view who assigned the status and when.
- Select the client and press F4 to view the status history.
- Make sure to document the status number associated with each status, as most reporting will use the number and not the description.
- For example, if you want to check who changed a client's status to Final, you can use Client Status to view who assigned the status and when.
For more information
How to customize fonts and colors
![]() The font and size cannot be changed on the tax return. The form input is approved by the federal and state taxing authorities and cannot be changed.
The font and size cannot be changed on the tax return. The form input is approved by the federal and state taxing authorities and cannot be changed.
- In the Settings menu, choose Primary Options.
- On the Fonts and Colors tab, customize the look of the client list and details to make the program easier for you to use.
- For example, you can change the font type or size of the client list to make it easier for you to read.
- We recommend:
- Yellow for Highlighted items
- Blue for Normal text
- Red for Imported data items.
- We also recommend changing your Prior Year program font to Pink to distinguish it from the current year return.
- This will help stop you from inadvertently modifying prior year inputs when working a comparison.
![]() Locking prior year or completed returns is also recommended to prevent making changes.
Locking prior year or completed returns is also recommended to prevent making changes.
How to customize your client list
- In the Settings menu, choose Options.
- On the Display tab, change how your client database is ordered and how the program sorts it.
- For example, you can add the e-file column to show whether clients are e-filing.
- You can also sort clients by the e-file column and group them by type of e-file.
- To see all the options available for display, click + to expand. Click - to collapse.
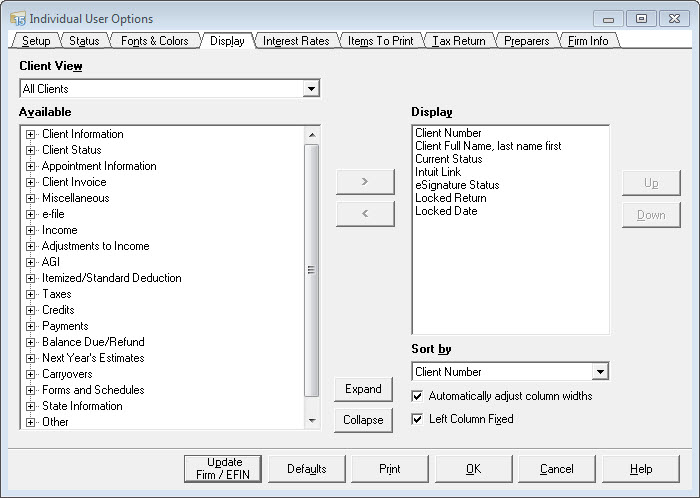
At a minimum, it's recommended you include the following fields in the client list Display:
- Client Full Name, last name first
- Current Status
- Intuit Link
- eSignature Status
- Locked Return
- Locked Date
- Other fields helpful to your firm
How to customize interest rates
- In the Settings menu, choose Options.
- On the Interest Rates tab, the program uses the interest rates and the filing date to calculate late penalties and interest.
- Enter the interest rate that applies for each quarter, even if it's the same as the previous quarter.
- Use xx.xxx format (e.g., enter 10% as 10; enter 9 1/8% as 9.125).
- Lacerte requires that all applicable quarters up to and including the filing date be entered in their respective fields.
- Failure to enter the IRS or state interest rates for any given quarter will cause incorrect late interest calculations.
- For returns filed after the last listed quarter, you must manually calculate late interest and enter it in the appropriate input field.
- Enter the interest rate that applies for each quarter, even if it's the same as the previous quarter.
- See How to enter federal and state interest rates for further instructions.
![]() Because interest rates do not apply to Partnership returns, this tab does not display in the Partnership module.
Because interest rates do not apply to Partnership returns, this tab does not display in the Partnership module.
How to customize items to print
- In the Settings menu, choose Options.
- On the Items to Print tab, choose which items print with different copies of a tax return such as:
- client correspondence
- mailing envelopes
- slip sheets
- supporting statements, worksheets, and diagnostics and their collation order
- For example, you can choose to print just the federal return, the state return, the client letter, and the client invoice for the Client Copy of the return.
- For the Preparer Review copy, you can also choose to print the federal return, the state return, all worksheets, and all schedules.
- Or, if you need three review copies (including worksheets and diagnostics) and only one client copy, you can print and collate as you wish.
![]() When Only e-file Forms in Complete Return is set to Yes (at the bottom of the screen), only those forms that require a signature will print.
When Only e-file Forms in Complete Return is set to Yes (at the bottom of the screen), only those forms that require a signature will print.
You can change settings to print completely collated returns for a:
- Preparer Review copy (copies for review)
- Preparer File copy (copies for your files)
- Client copy (copies for your client's files)
- Government filing copy (final return copies to file with governmental taxing authorities)
- Extensions Only
- Additional K-1 Package (Partnership & S-Corp only)
- Participant Package (Partnership & S-Corp only)
It's recommended the following forms be included at the beginning of the Client copy: Federal and State e-file Signature forms (8879), the Tax Summary, the Client Letter, and the Client Invoice.
- This will make it easier to print signature forms, instead of the entire return, when you share an electronic copy.
How to customize the tax return display and printing options
- In the Settings menu, choose Options.
- On the Tax Return tab, you can specify how the program prints forms and schedules.
- The Tax Return Options section controls how the program prints forms such as text style, the order of item descriptions, and so on.
- The Federal Tax Options and State Options sections control how and when the program prints specific forms and schedules.
- You can also choose to print optional worksheets that provide detailed information about specific calculations.
How to customize preparer information
- In the Settings menu, choose Primary Options.
- On the Preparers tab, click the Modify button to enter information about each preparer in your firm (up to 500).
- We recommend entering information for every preparer. It's used in many program features, such as the Appointment Manager and Database Reports, and can also be used to sort mailing labels, status reports, and client lists.
- See How to add, delete or modify a Preparer in Lacerte for further details.
- We recommend entering information for every preparer. It's used in many program features, such as the Appointment Manager and Database Reports, and can also be used to sort mailing labels, status reports, and client lists.
- On the Setup tab, in the Program Options section, use the New Client Default Preparer field to specify the preparer assigned to all new clients.
How to customize firm information
- In the Settings menu, choose Primary Options.
- On the Firm Info tab, you can change telephone, fax numbers, e-mail addresses, or EFIN numbers.
- See How to update your firm information in Lacerte for further instructions.
- For licensing purposes, you can't change the Lacerte Customer Number, Firm Name, Firm Address, or ZIP code.
- If there is an error in this information, you must correct it via My Account to receive a new preparer file.
How to set form fonts to print in upper case or mixed case
- From the Settings menu, select Options.
- Select the Tax Return tab.
- Locate the Tax Return Options section.
- Locate the field Text Style.
- Select the applicable option from the dropdown menu:
- Upper case
- Mixed case
- Click OK.


