The plan administrator must electronically sign the benefit plan return before you can e-file.
Before you start:
- All signers of the benefit plan must register for EFAST2 on the DOL website.
- Make sure you have a valid email address for each signer.
- Make sure your email address has been entered in User Options, on the Preparers tab.
Follow these steps to prepare the return for signature:
- Go to Screen 4, Electronic Filing.
- Click on e-file Misc from the left navigation panel.
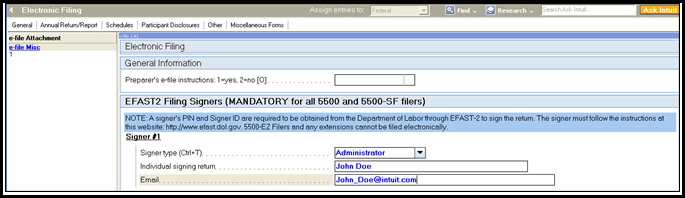
- Select Administrator from the Signer Type (Ctrl+T) drop-down menu.
- Enter the signer's name in Individual signing return.
- Enter the signer's e-mail in Email.
- Complete the return.
Once you've resolved all critical diagnostics besides "The return must be electronically signed before e-filing the return... (ref. #13799)," you're ready to send the signature request.
To send the signature request:
- Go to the Client list.
- Highlight the client file.
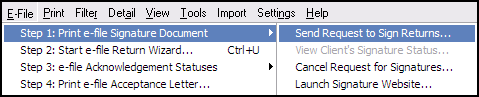
- Click on the Request Signature link (or click on the E-file menu, select Step 1: Print e-file Signature Document, and press Send Request to Sign Returns.)
- Start the Signature process. You will have a chance to edit the request email at this point. Click Next to continue.
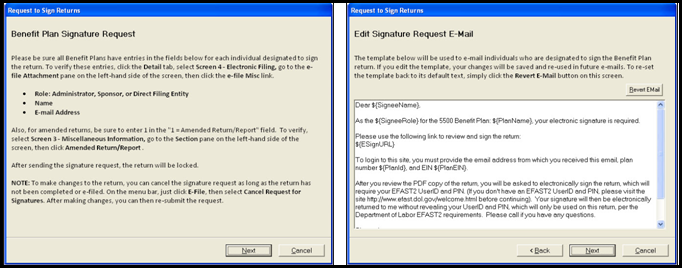
- Review the e-mail that will be sent. Click Next to continue.
- Once the request has been processed, you will see the Signature Request Summary. Click Finish to complete.
- The Signature Status column will now display Pending.
If your client is in the office, you can have them sign immediately by selecting the E-file menu and clicking Launch Signature Website.
Steps for the signer to complete the request
- Follow the link in the e-mail to review and sign the return.
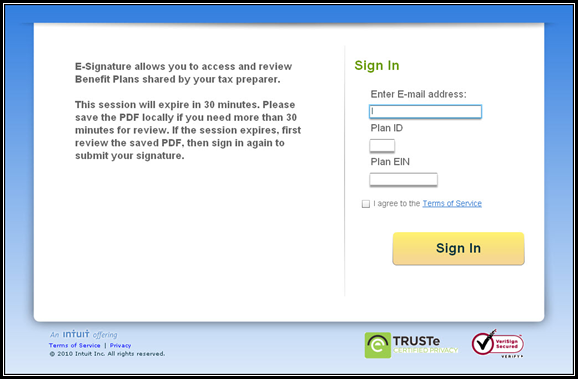
- Enter your e-mail address, as well as the Plan ID and Plan EIN that were provided in the e-mail.
- Check the box to agree to the terms of service.
- Press Sign In, then click Let's Go.
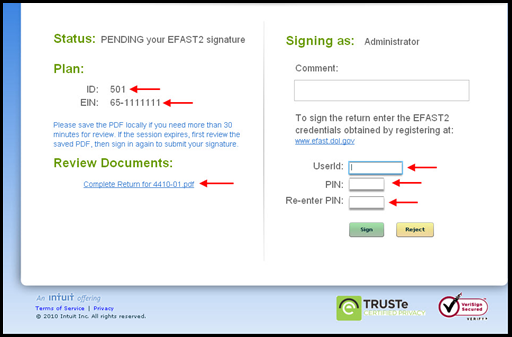
- Click on the PDF under Review Documents to review the return.
- Enter your EFAST2 UserId and PIN.
- Press Sign to approve the return.
After the return is signed:
- The Signature Status column will change to Complete within 15 minutes of all signers completing the request. Once the status is complete, you can e-file the return.
- If a signer rejects the return, you must modify the return in order to send another signature request.
- Diagnostic ref. #13799 will continue to generate, but won't prevent you from e-filing.
Alternative method for signing e-filed Form 5500
May, 13, 2010 announcement from the Department of Labor, concerning an alternative method of signing e-filed Form 5500:
"... The EFAST2 electronic filing system for Forms 5500 and 5500-SF employee benefit plan annual reports has a new e-signature option....
Under the new e-signature option, preparers can get their own signing credentials and submit the electronic Form 5500 or 5500-SF for the plan. The preparer must have specific written authorization from the plan administrator to submit the plan?s electronic filing, and attach a PDF copy of the manually signed Form 5500 or 5500-SF to the electronic filing.
The preparer must communicate to the plan administrator any inquiries received from federal agencies regarding the filing, and inform the plan administrator that he image of the manual signature will be publicly disclosed on the Internet with the annual return/report.
This option will be available in the government-sponsored IFILE application beginning May 13, 2010.
![]() The essential difference in the alternative method is that the tax preparer is providing the electronic signature for the return. The DOL has indicated they'd prefer the original method where the actual benefit plan administrator, signor, or DFE obtains their own User Name and PIN and go through this process.
The essential difference in the alternative method is that the tax preparer is providing the electronic signature for the return. The DOL has indicated they'd prefer the original method where the actual benefit plan administrator, signor, or DFE obtains their own User Name and PIN and go through this process.
Follow these steps to sign Form 5500 on the behalf of the administrator:
- Obtain the manual written signature of the actual plan administrator/sponsor on Page 1 of Form 5500 or 5500-SF.
- Scan the Form 5500 or Form 5500-SF and attach the PDF copy to the return.
- On Screen 4, Electronic Filing, click Attach PDF and select the scanned copy of the return. Open the dropdown field labeled Attachments, and then select Other Attachments.

- On Screen 4, Electronic Filing, click Attach PDF and select the scanned copy of the return. Open the dropdown field labeled Attachments, and then select Other Attachments.
- Go to Screen 4, Electronic Filing.
- Select e-file Misc from the left navigation panel.
- Select Administrator from the Signer Type dropdown menu.
- Enter the name of the plan administrator in the Individual signing return field.
- This is the plan administrator who manually signed the return.
- Enter your E-mail.
- If more than one person signed the hard copy of the return as described in step 1, only the administrator's information needs to be entered on Screen 4.

- If more than one person signed the hard copy of the return as described in step 1, only the administrator's information needs to be entered on Screen 4.
- Go to the Client list.
- Highlight the client file.
- From the E-File menu, select Step 1: Print e-file Signature Document and choose Send Request to Sign Returns.
- Click through the Signature Request window.
- The Send Request to Sign Returns option is only available when on the main client list and a client is selected. Otherwise, this option will be unavailable.
- The Send Request to Sign Returns option is only available when on the main client list and a client is selected. Otherwise, this option will be unavailable.
- From the E-File menu, select Step 1: Print e-file Signature Document and choose Launch Signature Website.
- On the website, enter the following:
- E-mail address
- Tax Year
- Plan ID
- Plan EIN
- Check the box labeled I agree to the Terms and Service.
- Click Sign In, and then click Let's go.
- Enter your User ID (obtained from DOL).
- Enter your PIN.
- Re-enter your PIN.
- Click on Sign In.
- Go back into Lacerte.
- Click on the Pending Signature Status.
- The Signature Status window should display Signed next to Admin.
- Click Close.
- The Signature Status should change from Pending to Complete, and you'll be able to e-file the return.
